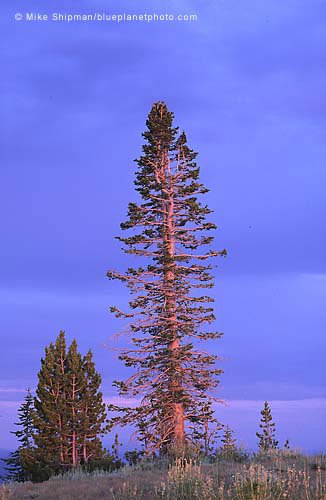
Blue Planet Photography - Art From Earth

I'm a professional photographer and this blog generally contains information about photography. But, since I also spent part of my life as a wildlife biologist, there will be some items about the environment as well. Maybe even some irritable ramblings.

My Photo
Name:
Location: Nampa, Idaho, United States

12/31/2005

Universal Photographic Digital Imaging Guidelines

The UPDIG aim to clarify issues affecting accurate reproduction and management of digital image files. Prepared by an ad-hoc industry consortium, allied trade groups and manufacturers that form the UPDIG Working Group, 15 guidelines and accompanying Best Practices documents, aim to clarify issues affecting accurate reproduction and management of digital files. These guidelines are appropriate for anyone working with digital files.

The guidelines are:
1. Manage the Color: ICC profiles
2. Calibrate the monitor
3. Choose a wide gamut
4. Capture the raw data
5. Embed the profiles
6. Color space recommendations
7. Formats and names
8. Appropriate Resolution
9. Sharpen last
10. Delivery
11. File info
12. Describe what's there
13. Send a guide
14. Disk labels
15. Long term

The guidelines are available at www.updig.org

12/30/2005

Cleaning DSLR sensors

Here's a link to a great site written by 2 camera repair guys on how to clean the CCD/CMOS sensor cover of DSLR cameras. They describe several of the most popular methods (and some you don't want to try) from the Eclipse solution to the Sensor Brush, provide pros and cons to each, and describe the cleaning procedure recommended by them and some camera manufacturers. It should go without saying that you read the entire procedure before doing this yourself.

The site is Cleaning Digital Cameras

Cleaning dust and scratches from DSLR and scanned film

Here's a tip for finding most of the dust specs and scratches on digital files or scanned slides or negs, particularly on open areas like blue sky. I've been using a variant of this for a few weeks, using just a levels adjustment layer, but an article in a recent PDN had a different technique by David Harpe and I just combined them. It's pretty effective, although it does increase the working size of your image file. You can remove the layers when you're done removing your dust and scratches.

1. Open your image in Photoshop

2. Click on "layer", then "new adjustment layer - Invert [3rd from the bottom of the pull-down adjustment layer menu". This creates a separate layer that you can manipulate without affecting the original image. The dust specs will be white-ish blobs, not dark. Use a levels adjustment layer to fine tune contrast (see below).

3. If you'd like to retain the dark blobs, on the Layers palette, at the top left, click on the drop down arrow next to "normal" and select "Difference" - near the bottom. If you use this step, I recommend also adding a levels adjustment to fine tune the contrast (see below).

4. Your dust and scratches should become more visible. Select the background layer, zoom to "actual pixels" or 100%, and remove the specs with the healing or clone brush.

If you want to increase the visibility, do the following which will add another adjustment layer.

5. Click on "layer", then "new adjustment layer" - Levels".

6. For "Invert" layer only: On the levels histogram, move the far left slider to the right to darken the layer a little bit. This makes smaller dust specs more visible as well as specs that are in lighter areas of the image. You can adjust the right hand slider to get the best contrast for detecting dust on your image

7. For "invert" and "Difference" layers: On the levels histogram, move the far right slifer to the left to lighten the layer a bit, increasing the contrast with the dust blobs.

7. Select the background layer, zoom to "actual pixels" or 100%, and remove the specs with the healing or clone brush

8. When done, drag and drop the adjustment layers into the trash and save the cleaned image.

12/29/2005

The Photographer's Responsibilty

This is a topic I've been working on for some time, both for my own intellectual gratification, and to pass on once my ruminations are complete. For a bit of a taste, here's an interesting piece I came across on another blog chrisdclerico.com about a photographer in China who saw an opportunity and patiently waited for the "decisive moment". Then, he was chastised for it in the press, but perhaps his work prompted action (photographs can be a call to action, you know).

Here's the link to the article: www.ananova.com/news/story/sm_1399668.html

Here's the teaser photo (part of a series):

Domains for sale

I have 3 domains that I am selling. These are the domain name only, no web pages. The domains are:

cowboystockimages.com
cowboystockphoto.com
cowboystockphotography.com

These are domain names I purchased earlier in 2005 thinking I would create a separate website for my work, but it's not going to happen. If you are interested in purchasing one or more of the names, let me know. If you know of anyone who might be interested, let them know. You can make an offer directly to me or via www.tdnam.com.

The art of the headline

Coroner: Tree trimmer dies in wood chipper mishap


Doesn't that just say everything you need to know?

Pic of the Day 12/29/05


Big Brother
Elko County, Nevada

Cleaning DSLR sensors

There are several techniques and products for cleaning dust and debris from the CCD or CMOS sensor on digital SLR cameras (cameras with non-removeable lenses don't have to worry about this). I started out with Eclipse fluid and sensor swabs www.photosol.com but using fluid to clean the sensor on my 1Ds made me a bit worried. Used properly, the method is likely safe. But, as with all things fluid, accidents do happen. So, I started looking around for another method and came across Visible Dust, a Canadian company that manufactures electrostatic brushes for sensor cleaning. These tools resemble paint brushes but are made of very fine strands that are activated (charged) and cleaned by blowing compressed air through the bristles. I purchased a set last spring and I have to say I've been very happy with the performance. One or two swipes across the sensor with a dry brush and most, if not all, dust specks are removed from the middle as well as the edges and corners. Quick and easy.

One issue, though, is with the use of canned air to blow across the bristles. Canned air can spit freon and other liquid compounds that can get onto the bristles and then to your sensor. Also, compressed cans of air are not allowed on airline flights and may be difficult or impossible to find in out-of-the-way destinations. So, Visible Dust has come out with a new product called the Sensor Brush SD, which is basically a motorized handle that fits the sensor brush and spins it, both cleaning and charging without the use of canned air. This accessoriy is estimated to cost about $38 US (depending upon the CAN-US curency conversion rate at time of purchase). I don't have the Sensor Brush SD, but I'm considering it.

12/28/2005

Pic of the Day 12.28.05


Freak Alley Gallery
Boise, Idaho

12/27/2005

The passing of an artform: SX-70 Manipulation


And The Angels Bled
Polaroid SX-70 manipulation by Mike Shipman


I knew it was inevitable. A 30-yr old film generally hanging on by a
thread from the beginning, in terms of its "flaw", then being
championed by artists all over the world, creating the market so
Polaroid would keep the "flaw" intact (for the most part) and artists
could exploit it for decades. Now, Polaroid has said they will end
production of Time Zero film in the first quarter of 2006.

You can read the notice below, which I lifted from the Polaroid website at
www.polaroid.com/sx70/en/index.html

***
Please be advised that Polaroid will be discontinuing the manufacture
of its SX-70 / Time-Zero film within the first 3 months of 2006 due
to the phasing out of components used in the production of this film.

We realise that this is disappointing news for our loyal SX-70 users
and we would like to underline that, although the circumstances made
it inevitable, it was not an easy decision.

We are very sorry for the inconvenience.

For customers who would like to continue using their SX-70 camera, we
can offer some film alternatives below. However, we do appreciate
that these films do not offer the same characteristics as SX-70 /
Time-Zero film.
***

SX-70 film, now called Time Zero film, came out in 1972 with the Polaroid SX-70 Land Camera, a folding Polaroid that, for its day, was the most advanced camera on the market. The film had one "flaw". The emulsion did not harden as quickly as it was supposed to, allowing artists using various tools to push and smear the dye and base layers around to create impressionistic-looking, or "painterly" images. Sometimes called SX-70 manipulation (a long term), altered SX-70, painterly photography, or a variety of other terms, the essential description is that it is done by hand. Some people continue the process through digital manipulation or painting/drawing over the Mylar cover with oils, acrylics, or inks, or otherwise embellishing the image. I tend to prefer the straight altered image. I do scan the originals and enlarge them for printing, but I don't do any further manipulation.

Since the original film has depth (in that the emulsion is composed of several layers) the altered image also has depth, which can accentuate the feeling of depth in the image and also be apparent under certain lighting conditions and viewing angles. A print, although striking when enlarged, lacks this dimensional component.

Being only 3" x 3 1/8", the film has a small working area, so tools and timing are important in creating the effects desired. However, in reality you're not ever really sure what you'll end up with once you start bacause the work is done in real time, you create more or less on the fly. Environmental conditions, mental and emotional state, relationship to the subject, tools used, among others, all play a role in how the final piece turns out.
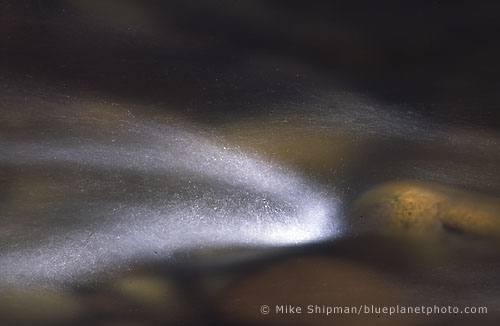

Blue
Polaroid SX-70 manipulation by Mike Shipman


The process starts once the exposure is made and the film is passed through the rollers, squeezing the developer across the film. The development can be arrested by putting the film at that point into the freezer, but I like working on the image "live", at the moment. I have a "toolkit" of manipulators that I carry with me, but I will also use found items on site. Sometimes, I will use only found items, then discard them once the image is done, thereby preserving the effect on the original.

I create 2 types of original SX-70 manipulation. By original I mean that the manipulations done are different for each image created, no two being the same. Much like 2 paintings of the same subject.

The first original is created with the Polaroid SX-70 camera. This results in a "true original" in that the image cannot generally be repeated. The image is shot with the camera, the film is processed on the spot following the exposure, and the manipulation of the image is done at that same point in time.

The second original is done using 35mm slide film and a slide printer (Daylab). For this I am using a 35mm transparency and exposing the SX-70 film with that image, similar to how a print is made in a darkroom using a negative and enlarger. The image is then altered after the film is exposed. In this case, several different original "versions" of the same image can be made; originals in that each separate image is manipulated using different techniques, pressures, emphasis, etc. Using the 35mm (now digital) camera allows for more flexibility in lens choice, lighting options, shooting conditions, etc. To effectively work the emulsion on the Polaroid film, the temperature of the film needs to be above 80 degrees (F), so wintertime manipulations are tricky at best. Enterprising artists have come up with ingenious mobile heating devices to allow for manipulations to be done in less than optimal conditions.

So, this art form will be disappearing (new creations anyway) in 2006. Unless another lab can replicate or purchase the "recipe" from Polaroid to continue production. I've been buying as much film as I can to build up my library of SX-70 work. I'll definitely miss it.

To see more of my SX-70 work, go to

12/24/2005

Pic of the Day 12/24/05


Fire and Isis performance, Boise, Idaho

People are hung up on words

One of the things that continues to bother me about current trends in society is the increasing determination to impart some relevency to words that have completely lost their meaning. Like "Christmas". Seems that this year the debate and ruckus revolves around whether the traditional pagan symbol of the "Christmas Tree" should be referred to as a "Holiday Tree" instead. I'm not going to get into the "Merry Christmas versus Happy Holidays" debacle because it's all the same silliness.

Christmas is about the birth of Jesus, not giving presents, although presents were purportedly given to the newborn which probably started the tradition and soon overtook the essential spirit behind the event. Now, I'm not a die-hard Christian, nor a true believer, but I do ascribe to the basic idea of a caring, spiritual, treat-others-as-you-would-have-them-treat-you, way of life. I'm also not getting into any discussion here over the traditional or modern interpretations of Christmas, etc. Essentially, I don't care what religion is being espoused as long as it doesn't impinge on my own personal belief system (in other words, don't come to my door trying to convert me - but that's another story). See, freedom of choice is one of the foundations of Christianity - in so much as freedom is allowed by a God who demands you obey and believe implicitly or you go to Hell (but that's also another story).

So, what I (or you) believe, what spiritual meaning I (or you) give to "things", is in no way shape or form related to how the "thing" is identified by name.

Claude Monet said "To see we must forget the name of the thing we are looking at".


By relying upon the name of a thing, you tend to fail to look beyond to what it is, how it is, why it is, what it means or represents, how it relates to my/your life or the life of others. A name only serves to separate the thing from other things, to make it easier for people to discuss it and not get confused whether we're talking about a car or a fork.

The name of a thing is a purely human construct arrived at through millennia of language development. Example: scientific nomenclature for animal and plant species (Latin names). The primary reason Linnaeus came up with this system of classification was because one person shouting "Hey, grab my ferret, will ya?" might not resonate with another who looks right at the animal and does nothing because to them it's not a ferret, but a "polecat". I'm sure you can think of many other examples of "common name mix-ups" - diaper/nappy, wagon/trolley, etc.

So, to call a pine tree (insert favorite species here) a Christmas Tree or a Holiday Tree, SDT (standing dead tree), firestarter, or to even boycott a dead tree merchant because their trees are not labeled "properly" is meaningless since most people are only referring to the very outer shell of the thing rather than what it is or symbolizes; which in the Christian sense is not the original meaning of the Yule tree anyway.

And, as far as we know, the tree doesn't care what you call it, either.

12/23/2005

Pic of the Day

Shooting the West, Winnemucca, Nevada

Here's a weekend photo gathering that is fun and informative. Shooting the West XVIII is held March 10 - 12 in Winnemucca, Nevada (a couple hours west of Elko in the north-central part of the state) and this year will have speakers such as Charles Cramer, master printer and landscape photographer, Robb Kendrick, Richard Menzies and more. A photo contest and field trip are also on tap. Go Here for more infor and to register. I've been once and it's a good time.

Put yourself on the map

I've added a feature called Frappr that allows you to put a pushpin on a map where you're located. More of an interesting "where do people come from" kind of thing than anything else. If you want to add your location, click on the Frappr button on the sidebar. Or you can click here to go directly to the mapping page. Rest assured, no personal information is collected, only your zip code. So, it's not like I'll be coming to your house or anything.

12/22/2005

Pic of the day


Stream Abstract

12/21/2005

Pic of the day


Cobble Beach, Newport, Oregon

12/20/2005

Now for something completely different

If you ever want to test the durability of your camera equipment, photograph a motorcycle hill climb. Especially in the dry, dusty, hot and sweaty conditions of southwest Idaho. These photographs were shot this past summer. There are 2 hills, one run has a length of 250 ft and is the "small" hill. The other is over 460 ft, with the upper 100 or so feet nearly vertical. The top 3 photos are from the small hill and the remaining images are on the big hill. At the end of the day, it looked like I and my camera had just been dug up out of the ground. The motorcycle in the bottom photograph, if you notice, is missing its rider.

As a wildlife biologist and conservationist, this type of activity creates some interesting feelings and internal debates while at the same time fuels my photographic intent of showing the human interaction and connection with nature, however slim, destructive, endearing, or nurturing.


12/19/2005

Pic of the day


Western Idaho Fair. The ubiquitous swing ride.

I'm in the Idaho Statesman

Here's a link to an article that appeared today (12/19) in the Idaho Statesman regarding my public art project: http://www.idahostatesman.com/apps/pbcs.dll/article?AID=/20051219/NEWS01/512190319&SearchID=73229941032975

12/16/2005

A bit about myself


I'm not a professionally-trained photographer. I'm self-taught. Been photographing almost my whole life, but wasn't your typical photo guy, no yearbook jobs, mostly snapshots until the 80s when I started getting pretty serious. My education, degree, and career is/was wildlife biology. Spent a few years with the US Fish and Wildlife Service, US Forest Service, Colorado State Parks, private consulting (had an influence in the design of the newest U.S. ski resort), the Denver Museum of Natural History, then decided I should switch gears and become a photographer since I did a lot of that when I was out in the field. So, here it is. Opened a full time studio in May, 2004 and continue to make a run at it. It's tough, but I love working for myself. Sometimes the government can get under your skin just a little. My website is www.blueplanetphoto.com if you want to check it out.

The photo is the Middle Fork of the Boise River, up the river about 40 miles from Boise, Idaho.

I shoot commercial (products, storefronts, architecture, etc.), fine art (nature, abstracts, hot rods, figure studies, anything that attracts my eye), conduct classes and workshops and plan the occasional trip (working on my 2006 schedule now). I also have a line of photo-imaged products that I make here in the studio (stone coasters, glass cutting boards, decorative tile murals, etc.).

I don't know exactly what this blog is going to contain, or how often I'll update it. I'll shoot for once a week and also show new photos, pass on interesting information I come across, and probably list some upcoming events. You never know.